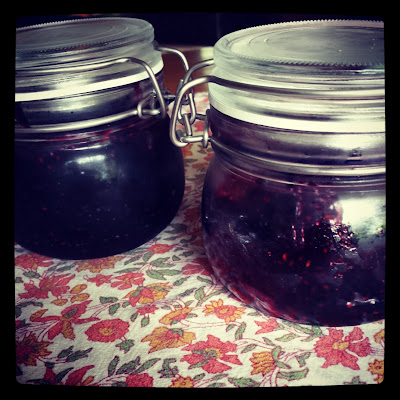
Homemade Blackberry Lime Jam
The other day I made blackberry jam from berries we picked at our secret spot. The flavor was delicious – the lime gave it just a hint of tartness – but I overcooked it so that when it set up it was way too stiff to spread well. We’re still going to eat it, and it works fine on toast since the heat loosens it up a bit, but I’m thinking I might need to make jam thumbprint cookies or something similar to use it up so that I can have another go-round and get the jam to the right consistency.
I’m gearing up to do some water bath canning – maybe more jam, and I’m thinking the way my tomatoes are growing (or not growing) I’ve got some green tomato relish in my future as well. Are you canning anything this year as harvest time comes around?
Notecards Made From Natural Found Objects
Happy Independence Day!
Ah, the Fourth of July – time to go to a parade, grill a hotdog and watch some fireworks (or light some off, depending). It’s a fun day; it’s summer’s big holiday, after all. I love this holiday with all of it’s red white and blue and down home Americana and patriotism.
But if you have time, take a few minutes today to think about what the day is really about – here’s the first part of the Declaration of Independence (see the document and read the full transcript here):
“. . .We hold these truths to be self-evident, that all men are created equal, that they are endowed by their Creator with certain unalienable Rights, that among these are Life, Liberty and the pursuit of Happiness.–That to secure these rights, Governments are instituted among Men, deriving their just powers from the consent of the governed, –That whenever any Form of Government becomes destructive of these ends, it is the Right of the People to alter or to abolish it, and to institute new Government, laying its foundation on such principles and organizing its powers in such form, as to them shall seem most likely to effect their Safety and Happiness. Prudence, indeed, will dictate that Governments long established should not be changed for light and transient causes; and accordingly all experience hath shewn, that mankind are more disposed to suffer, while evils are sufferable, than to right themselves by abolishing the forms to which they are accustomed. But when a long train of abuses and usurpations, pursuing invariably the same Object evinces a design to reduce them under absolute Despotism, it is their right, it is their duty, to throw off such Government, and to provide new Guards for their future security. . . . “
Powerful words that should hold meaning for us even today, 237 years after they were written.
How I Organized My Kid’s Artwork Using Homemade Books
My daughter loves to make art. I’m pretty confident that not a day has gone by since the first time she picked up a crayon that she hasn’t drawn, colored or painted something. She also has a bit of a tendency to want to save every little drawing, which means we end up with piles and piles (reams) of paper around the house. What we’ve done since preschool is to save everything in boxes or bins for the year and then sort through it at the end of the school year, which makes it a bit easier to deal with but still leaves us with the dilemma of what to do with the artwork that makes it into the ‘save’ pile. Plus, having a whole bin worth of space means she’s tempted to put most everything into that save pile, whereas knowing we were making a book helped her to recycle some of the less important pieces.
This year I made homemade books out of the assorted drawings and paintings from the year. It was a very quick and easy project – it took much longer to round up the paper and sort through it than it did to bind the books. To make it even easier on myself I only used art that was standard letter-sized (or a bit larger for the covers) so that I didn’t have to trim it to fit, but you could make larger books if you had a lot of bigger paper, or crop it down.
I gathered up a stack of artwork, squared it all up so it was in a neat pile and stapled it once in the middle of the left side, very near the edge of the paper (I did this to keep the sheets together while I lined up the covers). Then I added a front and back cover and stapled it at the top and bottom and near the middle again. For some of the books I used her art for the covers and for some I used construction paper. I finished the books with a strip of washi tape covering the staples as a binding.
Now, I know some people like to scan their kids’ art and make photo books out of it, and I think that’s a cool idea but we would have volumes of photo books of art by now, and that’s not practical for our family. Plus, this way allows my daughter to curate her own art so that she can keep as much of it as she wants, and as she grows we can even re-evaluate it to keep a smaller sample in a new book. We’re both pleased with the way these turned out and I’m glad to finally have a system in place to corral all the paper!
Fabric Bags for a Moving Up Ceremony
My daughter’s teacher is kind of amazing. I’m so grateful that we had her this year! She started the year under difficult circumstances (long-term sub) and has done a really stellar job with the class. The year’s finally wrapping up this week, and as part of the class moving up ceremony she’s giving out these fabric bags, filled with some sort of surprise. My project was to write each child’s name on the bags and then they were able to decorate them in school today. I was a bit dismayed to find out I had to use puffy fabric paint for the names, since puffy paint is really not my craft forte. I was also bummed to see that I only had two spare bags in case of mess-ups, but luckily I didn’t need to use them. I can’t wait to see how the kids decorated their bags, and what’s inside them!
How I Used Extra Bamboo to Make A Decorative Bamboo Ladder for a Plant Trellis {Tutorial}
I planted a bougainvillaea last week in one of our patio planter boxes, and it needed something to climb and wind around. I also wanted something in that area that would help replace the look of the fig tree and fill up some of the vertical space and big expanse of the shed wall. The space behind the plant is quite small so it requires a narrow trellis or ladder and since I’d generally rather make something than buy it I decided a homemade rustic ladder would look nice.
As I’ve mentioned before we have a grove of black bamboo in our backyard that benefits from an occasional thinning. That means I’ve got quite a stack of long bamboo canes laying around ready to be used (I’ve got to thin it again so if anyone in the area wants bamboo for a project or for staking things in the garden, let me know). I found two thick long canes to use as the legs of the ladder, and laid them out on the ground. I just eyeballed the length and the spacing – since I was going for a rustic look I wasn’t concerned about it being perfect.
Next I took another cane of bamboo and laid it across the legs for the first rung. I marked where the cut should be and then sawed off the length with a pruning saw.
I put a bead of wood glue under each end of the rung on the ladder legs, and then tied the rung tightly with garden twine.
I continued up the ladder, spacing the rungs more or less evenly and gluing and tying them as I went. When I was done I put a bit of glue over each knot to help hold it in place, and when the glue was dry I trimmed the ends of the twine close to the knots.
Once everything was dry and the ladder was in place against the wall I added more glue to each joint for extra strength. This ladder wasn’t designed to hold up anything more than the branches of a plant, so it doesn’t need to be all that secure – I just want to keep it together if the twine starts to decay in a year or two.
I can imagine doing this again for other areas of the house – how about a skinnier ladder in the living room for a magazine rack?


