A Lunchtime Fruit Plate
I was getting ready for lunch today, looking in the fridge when I realized that we had a ton of fruit. I initially was going to make a fruit salad, but I decided to make a composed fruit plate instead and the kiddos loved it.
We had papaya, pear, strawberries, apples and grapes – they helped me take the tops off the berries, pulled the grapes off the bunch and helped arrange the fruit. I put the platter down on the table between them and let them choose what they wanted for their own plates. They absolutely inhaled the papaya, ate a lot of the strawberries and grapes, a few apples and hardly touched the pears (that’s ok, I ate those). Sometimes simple is so satisfying.
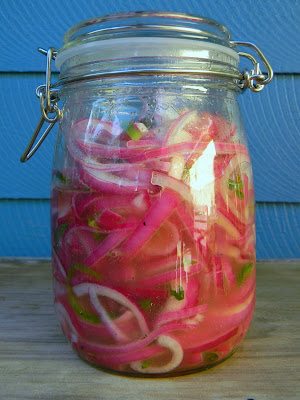
Salsa Criolla: Peruvian Red Onion Salsa {Recipe}
Salsa Criolla – Peruvian Red Onion Salsa
Makes 3 cups
2 red onions, large
1 jalapeno, large
1/2 cup mint leaves
1/2 cup lime juice (from about 4 limes)
1 cup cider vinegar
1 1/2 teaspoons kosher salt
1 teaspoon granulated sugar
1/2 teaspoon ground black pepper
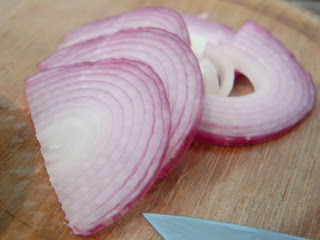 |
| Slice the onion very thinly. |
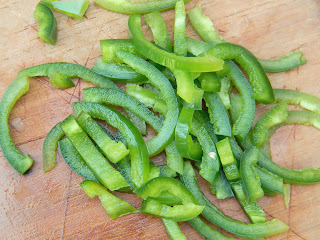 |
| Slice the jalapeno in thin strips. |
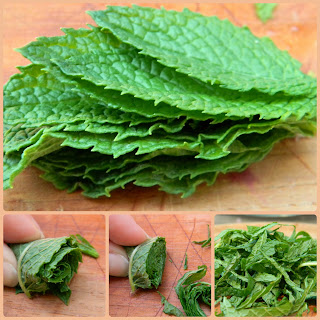 |
| Chiffonade the mint – stack the leaves together, roll them tightly into a log and then slice across the log into long thin strips. |
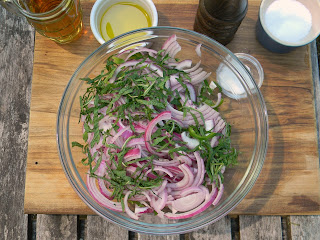 |
| Add all the ingredients in a bowl together. |
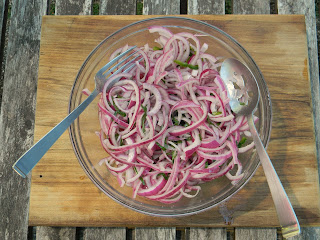 |
| Toss to combine. |
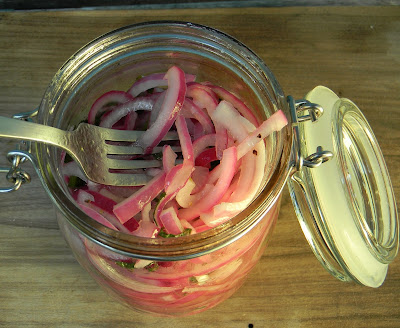 |
| I got this cute jar at Ikea, but any airtight container will do (even plastic wrap over a glass bowl). |
I’d love to hear what you think if you try this recipe out – I love converts to the salsa criolla cult.
20 Things To Do With Your Kids This Summer
Summer’s almost here, and it’s about this time that I start thinking about what to do with the kids during those long summer weekdays. Of course there are always the basics – go to a park, or the beach or play in the yard – but I like to come up with ideas that can enhance and extend learning throughout the summertime. Here are twenty ideas I’ll be drawing from this summer when the excitement of summer vacation wears off and the chorus of “I’m booorrreed” starts up.
1. Plant vegetable seeds and watch them grow. Even a little pot on a windowsill will let your kids plant and observe the seeds and take ownership of their care (keep the soil moist, kid!).
2. Go to a u-pick farm and pick fruit, then eat it fresh or make jam to enjoy after summer’s done. Talk about how the farmer plants seeds, tends the crops and harvests the fruit.
3. Go to the local zoo, but first research one animal with the kids beforehand. Once you’re at the zoo observe the animal you researched, then pick another animal to research from the one of the others you’ve seen.
4. Start a field journal for your own backyard or neighborhood. Help your kids to record observations of weather, animals and plants. For littler kids add printables of birds or animals you know they’ll see and let them check them off when they spot them.
5. Have a reading contest for the summer with a big chart and stickers, or join your local library’s reading challenge.
6. Be playground explorers. Visit a brand new (to you) playground once a week, play on it and rate it with the kids. Pretend to be reviewers – let your kids take pictures of the parts they liked the most.
7. Lots of towns have kids music concert series’ in the summer – check out the chamber of commerce for towns around you to see what’s available.
8. Go to the local, county or state fair. Check to see if there are children’s art contests, baking, canning or craft contests and see if your little ones would like to participate. Before or after your trip to the fair set up a midway in the backyard with carnival games and little prizes.
9. Go camping, either in the yard or somewhere farther afield.
10. Stay up late and watch a meteor shower (the Perseid shower August 11-13th is the largest of the summer with the potential for 50 meteors per hour). Spot constellations and satellites (you can even look up which satellite you’ve spotted via NASA).
11. If you leave near the seashore or are visiting there this summer, check the local tide tables and go out to the beach during a very low tide to search for starfish and anemones.
12. Have a water fight with the kids – either kids against adults or mixed teams. Kids love it when their parents get in on the fun.
13. Have a nature scavenger hunt at the park or beach. Ask kids to find pine cones, leaves, a curly stick, a white rock or other natural objects.
14. Have one day with themed lunches or dinners each week. You could do a different country each week, or state, or pick a color and plan the meal around that. Give the kids lots of input on the menu and food prep, or if they’re older let them handle the whole meal themselves.
15. Visit a farmer’s market – give your kids grocery money and let them pick the ingredients for a meal or picnic.
16. Let your kids dictate the day – go on a day trip or short overnight road trip – decide how far you’re willing to drive that day, then draw a circle on a road map with that diameter and let the kids pick a spot on the map to visit – depending on the kids’ ages you could do just 20 miles, or 50, or 100. You can print out your map online for free, or if you’re a member of AAA you can get free maps from them as well.
17. Organize a canned food or pet food drive – charitable giving often drops off in the summer months so you could help a local charity by organizing a food drive. Host a play date in the backyard or a park and ask all the guests to bring some food to donate.
18. Leave parks or the beach cleaner than when you got there – keep a few trash bags and work gloves or disposable gloves in the car and pick up some trash before you go. Of course use common sense – pick up ‘clean’ trash only.
19. Put together a park/beach kit and keep it in the trunk of your car – then stop spontaneously to play as often as you can. I like to keep some buckets/shovels/sandtoys, balls, a beach blanket and sidewalk chalk.
20. Make fish prints. Catch a fish (or buy a whole fish at the grocery store) and use it to make fish prints. Warning! This is a messy project that’s better done outside. Lay the fish on a tray, dry it off well with paper towels, then let your child apply paint to one side of the fish (I like to use fabric paint mixed with some extender). Once the fish is covered with paint, lay a piece of fabric (or paper) onto the fish and press down lightly on the back. Carefully pull up the fabric and set it aside to dry. DON’T EAT THE FISH afterwards!
I’d love to hear about some of the things you’re planning to do with your kids this summer. If you’ve done any of these with your family before, please leave me a comment and let me know how it went!
I’m sharing this post at some of these great link parties – check ’em out!
Bread and Butter Pickles: Perfect for Patio Suppers
I had a revelation the other day – pickles (at least these particular Bread and Butter Pickles) are so easy to make. For very little cost and very little effort I can have fresh, homemade pickles in the fridge all the time. These little pickles are quite addictive; delicious for snacking all on their own or as a garnish for sandwiches or burgers. My kids are gobbling them up and we’ve just about gone through the quart jar I made yesterday. Wait what, just yesterday? Wow.
I used the RecipeGirl’s recipe for Bread and Butter Pickles and I followed it pretty much exactly except for using regular yellow onion instead of sweet onion (I like the deeper ‘oniony’ flavor of regular onions – unless they’re for eating raw the sweets taste sort of insipid to me). I also don’t happen to have a fluted cucumber slicer on hand, but I had a mini inspiration and used the fluted straight edge of a heart-shaped cookie cutter to cut the cucumbers into ridged slices. The recipe is quick to make – the active time was less than 20 minutes and otherwise it’s just marination time (RecipeGirl’s recipe says to let the pickles marinate for 24 hours before eating them, but I think they were done well before that).
Since the jar is almost done, I’m planning to make more tomorrow and to just keep them on hand throughout the spring and summer. I’d also like to get in the habit of keeping a jar of Salsa Criolla in the fridge too since it goes so well with all the grilled meats, burgers and fish we eat in the summertime.
Cook the Collection #5: Simply Classic
Let me just start by saying if anyone ever wants to invite me to anything hosted by a Junior Leaguer I’m in -because apparently those Junior League ladies can cook! I’m so excited to be able to tell you all about Simply Classic: A New Collection of Recipes to Celebrate the Northwest, compiled by the Junior League of Seattle. This is one of my top five cookbooks and everything I’ve made from it has been delicious. Not only that, the recipes always get rave reviews – this is my go-to cookbook when I need a no-fail potluck dish or family dinner contribution. You can tell that these are recipes from real-world kitchens – with easy-to-find ingredients and common equipment they are easy to replicate at home. The recipes are comfort food with a Northwest twist, new American cooking with a global hint. Some of my favorites are the Tomato & Basil Tart, Sweet & Spicy Black Bean Salad, Green Bean & Feta Salad and Northwest Stew with Dried Cherries.

I’ve cooked from this book many many times before, but for the purpose of the Cook the Collection challenge I prepared the Northwest Autumn Salad at a family gathering this past weekend. This is one of my go-to green salad recipes and although it’s titled as an autumn salad, the dressing is light enough for any time of year and lends itself so well to adaptations. Of course I made a number of changes (I just can’t help myself) – pears instead of apples, walnuts instead of pecans and lime juice for lemon juice. We ate it alongside a knock-out grilled pork tenderloin and a simple fruit salad that was just right.
Banana S’mores
We had the first ‘campfire’ of the year this weekend in our patio fire pit. The weather has just been perfect the last few days and we knew we needed to take advantage of it while it lasted so we’ve been outside as much as possible. While the hubby got the fire going I fashioned some roasting sticks out of the black bamboo I culled from the grove last year. Looking at that link reminds me that I’ve got to do that again this year as well.
First we roasted hot dogs and brats over the fire (and toasted the buns over the fire as well) then we moved on to the marshmallows which let’s face it is what we all were waiting for. Suddenly I had a revelation – what if I roasted a banana slice and used that instead of a marshmallow in a S’more? I had to try it immediately!
I cut a thick slice of banana, skewered it on the end of a roasting stick and toasted it over the coals until it began to brown. Then I sandwiched it between two graham crackers and a square of chocolate. The heat from the banana melted the chocolate and it was delicious, but it was missing something. . .
. . . the marshmallow! Of course next I had to try a S’more with banana AND marshmallow, which was even better. Finally, I had to sacrifice for science’s sake and eat one more S’more made with only marshmallow, chocolate and graham cracker. It was weirdly just as satisfying as the variations – I guess that means I just really really love S’mores.
Do you have any special way to make S’mores?
May Day Work in the Garden
I spent May Day working in the garden. Our backyard was feeling neglected after a long stretch of dreary cold weather, so the sun outside got me motivated for an impromptu work party. Plus I had a number of plants languishing in their store pots and wanted to get them potted up in their permanent homes before the temperatures go up this weekend (please let them go up!). Of course, one thing led to another so after the potting was done I did some more pruning and overdue winter cleanup and put tomato cages around a few of the blueberry bushes. I haven’t tried that before but last summer they got so floppy that this should help keep them reined in.
I ended up planting up a few hanging baskets, a mixed herb pot I got from Trader Joe’s that was hideously root-bound and a miniature rose and lemon thyme I got as gifts awhile back. I love how happy plants look when you get them out of their too-small containers and into fresh soil and a long drink of water. They seem to perk up and look fresher almost instantly. We’ll enjoy these plants on our patio (and in our meals) all summer long.
Eggplant, Red Pepper and Cherry Tomato Pasta
We had a delicious meal the other night and I think I’ve found another tricky way to get my suddenly veggie-adverse 3 year-old to get a few vitamins in without him knowing. He’s kind of obsessed with pasta and noodles right now, so I roasted eggplant until it was soft and almost like a puree, then added it to onions, red pepper and cherry tomatoes to make a pasta sauce. The eggplant and sauce ended up coating the pasta, so although he picked out all of the peppers, tomatoes and onions I know he got a helping of eggplant.
Eggplant, Red Pepper and Cherry Tomato Pasta
serves 4-6
1 eggplant, roasted
1 red bell pepper, diced
1 yellow onion, diced
1 large clove garlic, minced
1 pint cherry tomatoes, sliced in half
1/2 cup water
1 box penne pasta (or whatever other type you’d like to use)
olive oil
kosher salt
black pepper
1. Roast the eggplant by slicing it in half lengthwise, sprinkling it with kosher salt and placing it cut side up on a sheet pan to bake in a 400 degree oven until it is soft and the tops are browned. When its done, remove it from the oven and scrape out the inside, discarding the peel.
2. Heat olive oil in a large heavy skillet or dutch oven over medium high heat, then add the onions and peppers and saute them until they begin to soften and brown lightly.
3. Add the roasted eggplant and stir well to break up the eggplant and combine with with the peppers and onions.
4. Add the minced garlic and cherry tomatoes and cook for 5 minutes, stirring often. Also add kosher salt and ground black pepper to taste.
5. Turn down the heat to medium low and add 1/2 cup water to the pan, stirring well. If the sauce begins to dry out too much, add more water from the pasta pot as needed.
6. Meanwhile, salt and boil water and cook the penne pasta according to the package directions.
7. When the pasta is ready, add it to the sauce along with a bit more water if you need to, then mix the pasta and sauce well to combine. Taste and adjust the seasonings if needed.
8. Serve topped with shaved or grated Parmesan cheese to taste.
Homemade Paper Collage Postcards, Revisited
I finally had time over the weekend to work on more paper collaged postcards and they were so fun to do again. I made three cards this time, all of them with a flower theme.
This one is my favorite:
I used my daughter’s letter stamps to stamp “Thank You” on two of the cards. My stamping certainly could have been neater, but I like to think it adds to the folk art appeal.
This was a collaboration between my daughter and me – she started the flower but then got bored, so I finished it.
I’ve got lots more ideas so I’m sure there will be more of these cards showing up in the future.
A Homemade Hat for an Afternoon Tea Party
I’m going to an afternoon tea party today with a bunch of my mama friends, and the lovely ladies who are hosting it requested we arrive in hat and gloves (with whimsy encouraged). I have a few sun hats but they aren’t especially whimsical so I made a hat this morning.
I used some cardboard from a box for the hat, then covered it with cotton duck fabric. The veil is a light lilac mesh from an old sheer curtain, and the whole thing is held together with copious amounts of hot glue. I haven’t decided whether to wear it with the veil in front or behind – in front is more dramatic but the veil gets in my eyes, so that’s not ideal.

